Project BikeCave

TheBigYin
Posts: 5,686 Member
Decided that I can't take the Squalor of my current bike area, so I've started to renovate it...
It began something like this...
 Squalid Bike Cave by The Big Yin, on Flickr
As you can see, I'd already begun to tire of the woodchip wallpaper. It wasn't exactly easy to remove - aside from the first bit that had been removed in the above picture, it came off in pieces around the size of a postage stamp.
Still - it's pretty much all off now, and I can start to plan whats happening.
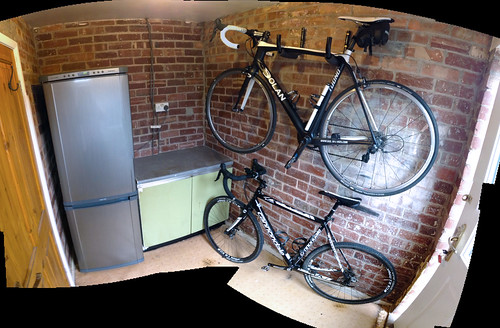
Here's my (fairly) blank canvas...

or, if you want a better view of the details - https://flic.kr/p/pe7zBX - it's a 20 shot composite panorama cobbled together in Photoshop, because the room is so small I can't get far enough away to take in the full horror of the scene...
It began something like this...
 Squalid Bike Cave by The Big Yin, on Flickr
As you can see, I'd already begun to tire of the woodchip wallpaper. It wasn't exactly easy to remove - aside from the first bit that had been removed in the above picture, it came off in pieces around the size of a postage stamp.
Still - it's pretty much all off now, and I can start to plan whats happening.
Here's my (fairly) blank canvas...

or, if you want a better view of the details - https://flic.kr/p/pe7zBX - it's a 20 shot composite panorama cobbled together in Photoshop, because the room is so small I can't get far enough away to take in the full horror of the scene...
0
Replies
-
I love the old brick
 0
0 -
I see the brickwork & think 'scuffed bar-tape' though
 0
0 -
Nice. That's a bit of work to have done. Waiting the next set of pictures to see what you do with the walls. :happy:0
-
Decided against the "bare brick" look - partly for Clive's reason - the whole scuffed saddle/bar tape scenario doesn't sit well with my Bike-OCD, but also partly because the room is very small, and felt rather dark and oppressive as soon as it wasn't in full sunlight... I really noticed it yesterday afternoon as the dark clouds and rain came in.
So, realising that I'm going to need to get my plastering kit back out, I spent this morning giving the brickwork a couple of coats of PVA sealant, and now it's time to start thinking about sorting the electricals. No photo's because - well - it looks the same, only with a coat of transparent gloop painted on the walls.
Time to leave it to dry before the third coat of less-dilute PVA, then maybe we can get the first gauge of plaster running tomorrow0 -
A man of many talents :laugh:
Mind you, having a 'fleet' of rental properties, if you couldn't do it yourself, it'd cost you a small fortune eh?
You should see some of the plastering in my house (new build - 2001), it looks like Stevie Wonder & Ray Charles did it! :huh:
Anyway - looking forward to seeing it progress 0
0 -
final PVA applied and the metal edging strips for the external corners near to the door/window frame now screwed into the brickwork. I'm currently having a few issues finding appropriate cabinetry for in there - until I decide on the cabinet arrangements, I don't want to actually arrange the electrical services on that wall - so tomorrow's likely to be more research than action I'm afraid. Really, REALLY want to try and go with stock cabinets and doors - don't want the hassle of having to try and fabricate stuff if I can get away with it. Difficult bit is I've got a definite "look" in my minds eye, but achieving that with stock cabinets isn't working too well so far.0
-
You could also paint the brick a light color with some of that thick sealant kind of paint meant for brick. That stuff also has a smooth texture, so bar tape might not get scuffed.0
-
first layer of "undercoat plaster" around the door/window surrounds is now on and gently curing. Not knocking myself about today, just a bit of gentle stuff here and there, as frankly, I'm feeling rough with a bit of a cold... May do first fix on some of the electricals later...0
-
You should see some of the plastering in my house (new build - 2001), it looks like Stevie Wonder & Ray Charles did it! :huh:
Anyway - looking forward to seeing it progress
That's funny. :laugh:0 -
You should see some of the plastering in my house (new build - 2001), it looks like Stevie Wonder & Ray Charles did it! :huh:
Anyway - looking forward to seeing it progress
That's funny. :laugh:
Seen more than my fair share of plasterwork like that... and done one or two examples of it too... I'm okay - certainly not professional quality, and far slower than a proper guy - but after lots of attempts, I've got to the point where I can make it stick to the wall, stay there for a good long time (I know to 15 years on one example without any cracking...) but with the state of the actual brickwork on that room, I'm not promising that the eventual room is going to be square and straight - smooth, probably, but the other two... unlikely.0 -
Well - that's all the electricals (well - first fix - i.e. boxes, ducting and cabling installed, wires stripped and ready to connect, sockets by the side of the box, and awaiting the final "disconnect a socket from the ringmain, connect one end into a junction box, out and back around the new wiring, into another junction box, and into the other side of the ringmain feed.
Also, additional hard wired/fused/switched dedicated spur for the outdoor security lighting (rather than the "plug it into a socket" solution that my mother's useless electrician fitted. It worked for the last 10+ years, and never burned the house down, but it wasn't RIGHT... It is now.
Tame electrician coming around for a hour this evening to ensure everything is to code (it is), safe (it is) and to hook it all up (so that I'm 100% covered for insurance purposes). Best part of that is I did him a favour with his business website last month, so it's not costing me anything.
No Photo's again I'm afraid, as I just had to get stuck in and make sure it was all done before he came around to finish up. Plus, at the moment, it actually looks a little scary and dangerous (with the bare ended wires sticking out for example, even though they're not connected to anything...) and I'd rather not have anything like that in my photo-feed.
Not a bad day for a guy who's full of cold...0 -
Well - yesterday evening, my tame sparky came around, checked everything, pronounced it all "to code, safe and well installed" then connected the whole shebang, fitted the sockets, re-tested, and left me with installation document pronouncing everything to be kosher. Today I've removed the door between the kitchen and bike-cave, given everything a thorough clean-down again, and a final coat of PVA incuding over the galvanised cable ducting... I'm now at the bit i've been dreading starting - actually starting the plastering job. I'm still feeling a bit rough with this cold, tbh, and every time I bend over my nose starts running, so I'm going to put the plastering on hold I think, for a couple of days... and hopefully get someone to give me a hand with the mixing, so I can just keep going with the plastering... it's not a big job, but its certainly going to take more than a single mix to cover the three walls - plus it's going to have to be a 2-3 coat process... 1 coat of bonding plaster to cover all the trunking and wavy brickwork, then a coat or two of finishing plaster, just to get a decent finish on there.0
-
Well - yesterday evening, my tame sparky came around, checked everything, pronounced it all "to code, safe and well installed" then connected the whole shebang, fitted the sockets, re-tested, and left me with installation document pronouncing everything to be kosher. Today I've removed the door between the kitchen and bike-cave, given everything a thorough clean-down again, and a final coat of PVA incuding over the galvanised cable ducting... I'm now at the bit i've been dreading starting - actually starting the plastering job. I'm still feeling a bit rough with this cold, tbh, and every time I bend over my nose starts running, so I'm going to put the plastering on hold I think, for a couple of days... and hopefully get someone to give me a hand with the mixing, so I can just keep going with the plastering... it's not a big job, but its certainly going to take more than a single mix to cover the three walls - plus it's going to have to be a 2-3 coat process... 1 coat of bonding plaster to cover all the trunking and wavy brickwork, then a coat or two of finishing plaster, just to get a decent finish on there.
At least with the cold you won't have to smell the fumes from the plaster. :laugh:0 -
Well - first gauge of plaster is now on the 2 "wired walls" - i.e. the two walls with electrical sockets, plus the window/door wall is ready for its skim also. Still not 100% decided as to if I actually plaster the "bike hanging wall" or if I just seal the brickwork and make a feature of it...
I'll try and decide (and maybe take a second opinion from a friend with better taste than I have...) before getting around to adding a skim coat of finishing plaster...
I do rather like the look of these "bike holder" things... 0
0 -
Mooooo! :laugh:I do rather like the look of these "bike holder" things... 0
0 -
Mooooo! :laugh:I do rather like the look of these "bike holder" things...
It does look like a Texas Longhorn doesn't it. :laugh: :laugh:0 -
That's actually the Idea, yeah
http://www.outlineworksltd.com/Products/trophy-bull-soft-touch-plastic-finish/
it's either that or the Stag's Head one...
http://www.outlineworksltd.com/Products/trophy-deer-soft-touch-plastic-finish/0 -
I think I like the bulls horns better than the stag antlers.0
-
That's actually the Idea, yeah
http://www.outlineworksltd.com/Products/trophy-bull-soft-touch-plastic-finish/
it's either that or the Stag's Head one...
http://www.outlineworksltd.com/Products/trophy-deer-soft-touch-plastic-finish/
You need them in flashing neon !!0 -
That's actually the Idea, yeah
http://www.outlineworksltd.com/Products/trophy-bull-soft-touch-plastic-finish/
it's either that or the Stag's Head one...
http://www.outlineworksltd.com/Products/trophy-deer-soft-touch-plastic-finish/
You need them in flashing neon !!
I was thinking the furry purple one...
(not really - my bike's never clean enough for the fur finishes)0 -
I like it, but £79.20?....that brings out the Yorkshire in me.0
-
I like it, but £79.20?....that brings out the Yorkshire in me.
yeah, me too a little - but considering how much I've saved doing the wiring, plastering and laying the flooring myself, not to mention building the cabinetry that's going in there, I can at least splurge a little on something important - like the thing that's holding £3.5k of bike off the ground... :laugh:0 -
It also looks very cool.And space-saving. Still... It would hurt
 0
0 -
three walls now with the first skim of finishing plaster on there... finally getting the hang of plastering again, though I'm still not 100% convinced I can do a good enough job on the "main wall". Pretty much paralysed by indicision at the moment - which is NOT GOOD as the entire contents of that very loaded little room are currently distributed all over the rest of the house and it's driving me NUTS!0
-
Okay - finally went for it. Out yesterday to the DIY shed, filled the boot of the Audi with sacks of Plaster, and today, decided to "bash on" and start the actual "Bike Wall"
As I was loading the third sack of plaster into the boot of the car yesterday a thought struck me. Each of these sacks weighed 25kg, requiring proper "lifting technique" to protect your back, especially when getting it over the lip of the rear loadspace. And yet, not so long ago, I used to walk around with over 2 and a half of these sacks worth of fat under my skin. :noway: I felt much better about myself for the rest of the day after that. :glasses:
Anyhow, it's dry and reasonably warm today, so, time to get mixing.
2 hours later and a sack and a half of bonding plaster later, we've got a 8-10mm gauge of plaster on the wall which is pretty much straighter and more level than any other wall in the house other than the ones I've already re-done. The thickness varies, because, well, frankly, it's a former "council house" - cheap, not fantastically well built accomodation for people who, at the time it was built, were never actually likely to own their own place - and so the brickwork isn't exactly what I'd refer to as top flight. It's all boding well for the skim coat.
I really wish that the room was actually large enough to get a half decent photo... every shot I show on here ends up being a stitched pano / composite of half a dozen shots, just to get coverage...
So - there we are - Clive, you can stop worrying about the nasty brickwork scratching my saddle and handlebar tape now.:laugh:0 -
My goodness - that is a lot of work you are putting into your bike cave. And more to come I'm sure with the cabinets, etc. Is it the photo editing that makes that floor look like a "sagging about to drop through the supports" thing or is it truly that bowl shaped?0
-
Definitely the photo that's wrong...0
-
Currently waiting on the final gauge of finishing plaster to completely and uniformly "cure" so I can get a mist-coat of finish on there... We're down to a 1 square metre patch next to the back door, which I guess is drying slowly because it's colder than the rest of the room by dint of the lower thermal insulation of the door than a 2 skin cavity brick wall...

0 -
okay, so the plaster finally dried overnight, and today I dragged up the old flooring, and managed to get a quick "mist coat" of emulsion over the plaster (for those of you who don't know what that is, it's a coat of water-based trade emulsion (latex paint for the septics) thinned out 50-50 with water, applied quickly to "seal" the plaster and prevent any further coats of the Emulsion getting the water "sucked out" of the paint before the finish cures. So, it doesn't really need to be a smooth "finish coat" just enough to cover everything. After this you leave it at least 4 hours or preferably overnight before applying a proper finish coat - or in my case a FIRST finish coat of matt emulsion where I can decide what and where needs any "filler" before a final coat.
It's looking better though... P1010461.jpg by The Big Yin, on Flickr
 Bikecave_mistcoat2.jpg by The Big Yin, on Flickr
 P1010462.jpg by The Big Yin, on Flickr
 bikecave-mistcoat1.jpg by The Big Yin, on Flickr
I think once there's a decent coat of paint on the woodwork, a finish coat on the walls and the flooring down it'll actually look like part of the house, rather than just an afterthought.
0 -
Todays update... "Skirting Board" (actually a moulded concrete base slab) is now painted - sanded, primed, and topcoated. First coat of finish emulsion applied to all 4 walls, and ceiling, then took a couple of hours out to try and find matching laminate flooring to continue the "faux granite tile" look through from the kitchen. 4 of the main "diy sheds" nothing matching, a couple lose but not quite, one colour matched but the tiles were a different shape. Was getting to the point of deciding to go for something contrasting instead, when I tried a place that sell off old "remaindered stock" - wandered in, and at the back there were 3 boxes of the exact matching stuff... boxes tatty but reasonably intact - one had an obvious scratch in the top "plank" others okay. Well - I needed 2 packs but had a quick chat with the manager and as they were all a bit scruffy, and potentially had some damage, got 3 packs for the price of two (and they were already substantially marked down from the normal new prices...)
Got home and looked - in total there are 3 planks out of 18 that are slightly marked. With the leftovers I already had, I reckon I needed maybe 10-11, so I've got a little scope for getting things right second time if need be... And, it's always handy to have a couple of spare sections - especially in a kitchen with lots of water potentially around...
Early Doors tomorrow, get another coat on the walls, out for a couple of hours for a ride hopefully, then back and get started on laying the flooring I reckon.
No photo's as basically it looks the same as yesterday, only a LOT whiter and less streaky everywhere.
0
This discussion has been closed.


