Tutorial: how to insert images in a blog

Mindful_Trent
Posts: 3,954 Member
Copied from my blog: http://www.myfitnesspal.com/blog/accountant_boi/view/tutorial-how-to-insert-images-in-a-blog-116126
This tutorial steps you through how to enter pictures to your blog, which is NOT the same as to the bulliten board posts
One thing is the same, though - your pictures need to have been uploaded to a photosharing site, like photobucket, prior to trying to post to your blog. You need the URL for your picture - the photosharing site should give you the link to use to post your picture on websites (the "direct link") - that's what you want. The format should be something like: http://www.photosite.com/useraccount/picturename.jpg
If it ends in .html or .htm then it's not the right URL. It should end in .gif or .jpg or .tif or another ending that is used for images. You can test it by pasting the URL into a web browser - if all you see come up is the image, then you've got the right one. If you see the photosharing website or any other stuff, then you don't have the right one.
SO - once you have your picture out on a sharing website and you have the link then here's what you do.
Step 1: Go to the page for your new blog post. After typing whatever text you want to type before the picture, then click on the "HTML" button on the right side of the toolbar
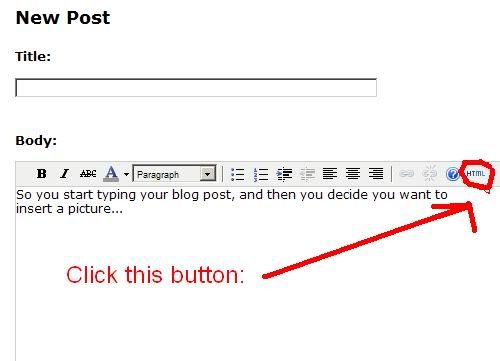
You should see this screen popup in a separate window:
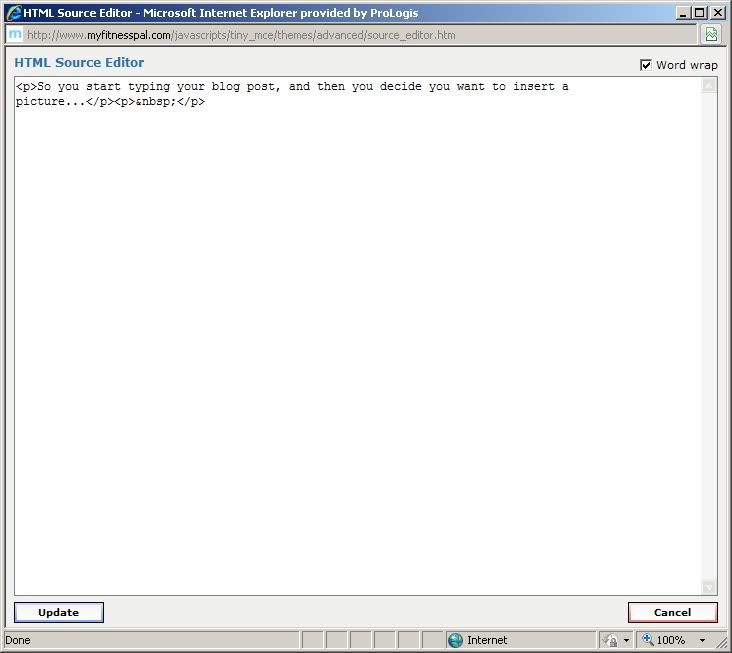
Step 2: Go to the end of the text that is on the screen and enter the following: <img src="yourpictureURL"> (The "yourpictureURL" is the URL I described at the beginning of this post.) See the example below - I've used a picture that I uploaded to photobucket. See how the URL ends in .jpg - I know it's the picture URL that way.

Step 3: Once you put the code in there with the photo URL, click the "Update" button at the bottom left:</
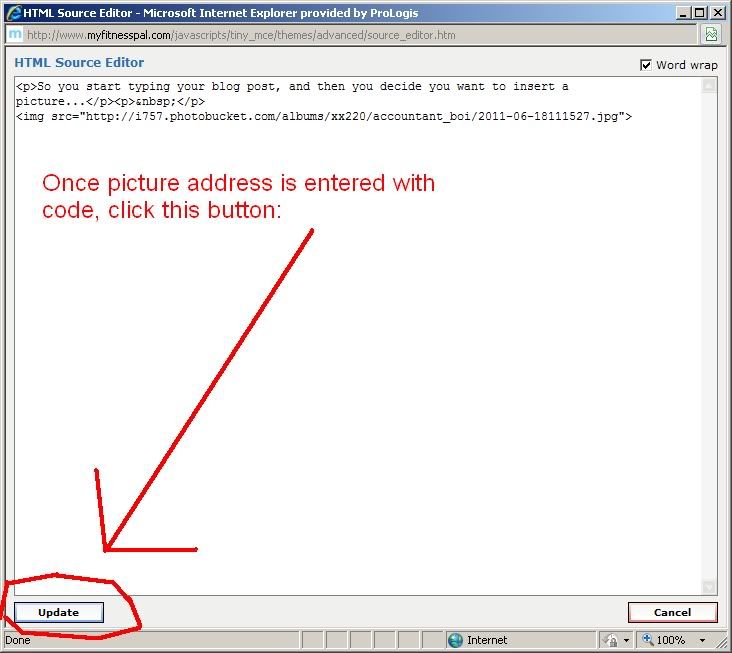
This will close the HTML editor window and you should see your picture on your blow post now. If you don't, that means you either didn't type the code exactly right - <img src="URL"> - with all the spaces, quotation marks, brackets, etc. as I've shown them, or your URL is bad
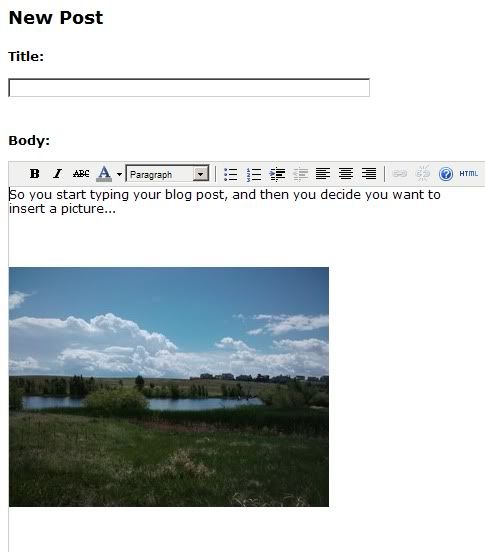
Here's my final blog in the example, showing the picture I inserted in:
One Note - some photo-sharing sites will actually give you the entire code ( <img src="photo URL.jpg">) to paste into websites/blogs. The reason I don't like using those is because usually they include extra code that makes the picture a link back to their website, which I prefer not to do. If you choose to use this, you go through the same steps and just paste that code into the HTML editor. It will likely look like this:
<a href="http://s757.photobucket.com/albums/xx220/accountant_boi/?action=view&current=Step2.jpg" target="_blank"><img src="http://i757.photobucket.com/albums/xx220/accountant_boi/Step2.jpg" border="0" alt="Photobucket"></a>
See... lots of extra code... very messy....)
The end! It's not so hard - once you do it once or twice, you'll be a pro. :drinker:
This tutorial steps you through how to enter pictures to your blog, which is NOT the same as to the bulliten board posts
One thing is the same, though - your pictures need to have been uploaded to a photosharing site, like photobucket, prior to trying to post to your blog. You need the URL for your picture - the photosharing site should give you the link to use to post your picture on websites (the "direct link") - that's what you want. The format should be something like: http://www.photosite.com/useraccount/picturename.jpg
If it ends in .html or .htm then it's not the right URL. It should end in .gif or .jpg or .tif or another ending that is used for images. You can test it by pasting the URL into a web browser - if all you see come up is the image, then you've got the right one. If you see the photosharing website or any other stuff, then you don't have the right one.
SO - once you have your picture out on a sharing website and you have the link then here's what you do.
Step 1: Go to the page for your new blog post. After typing whatever text you want to type before the picture, then click on the "HTML" button on the right side of the toolbar
You should see this screen popup in a separate window:
Step 2: Go to the end of the text that is on the screen and enter the following: <img src="yourpictureURL"> (The "yourpictureURL" is the URL I described at the beginning of this post.) See the example below - I've used a picture that I uploaded to photobucket. See how the URL ends in .jpg - I know it's the picture URL that way.
Step 3: Once you put the code in there with the photo URL, click the "Update" button at the bottom left:</
This will close the HTML editor window and you should see your picture on your blow post now. If you don't, that means you either didn't type the code exactly right - <img src="URL"> - with all the spaces, quotation marks, brackets, etc. as I've shown them, or your URL is bad
Here's my final blog in the example, showing the picture I inserted in:
One Note - some photo-sharing sites will actually give you the entire code ( <img src="photo URL.jpg">) to paste into websites/blogs. The reason I don't like using those is because usually they include extra code that makes the picture a link back to their website, which I prefer not to do. If you choose to use this, you go through the same steps and just paste that code into the HTML editor. It will likely look like this:
<a href="http://s757.photobucket.com/albums/xx220/accountant_boi/?action=view&current=Step2.jpg" target="_blank"><img src="http://i757.photobucket.com/albums/xx220/accountant_boi/Step2.jpg" border="0" alt="Photobucket"></a>
See... lots of extra code... very messy....)
The end! It's not so hard - once you do it once or twice, you'll be a pro. :drinker:
0
Replies
-
Glad you are my friend. Great info and help for those of us who aren't computer whizzes!0
-
bump0
-
Bump- thanks!0
-
thanks for the tip!0
-
Wow, that was awesome and worked perfectly. Thank you so much!0
-
thank you!0
-
bump0
-
bump0
-
Thanks - I was actually going to take pictures this weekend for a blog post so perfect timing.0
-
bump0
-
Thank you!0
-
") 0
0 -
bump0
-
This is the best... thanks for posting!0
-
bump for later0
-
bump for later0
-
bumping to keep!0
-
bump0


This discussion has been closed.
Categories
- All Categories
- 1.4M Health, Wellness and Goals
- 398.3K Introduce Yourself
- 44.7K Getting Started
- 261K Health and Weight Loss
- 176.4K Food and Nutrition
- 47.7K Recipes
- 233K Fitness and Exercise
- 462 Sleep, Mindfulness and Overall Wellness
- 6.5K Goal: Maintaining Weight
- 8.7K Goal: Gaining Weight and Body Building
- 153.5K Motivation and Support
- 8.4K Challenges
- 1.4K Debate Club
- 96.5K Chit-Chat
- 2.6K Fun and Games
- 4.7K MyFitnessPal Information
- 17 News and Announcements
- 21 MyFitnessPal Academy
- 1.5K Feature Suggestions and Ideas
- 3.2K MyFitnessPal Tech Support Questions